SNI-Changer using Mitm-Proxy
Overview
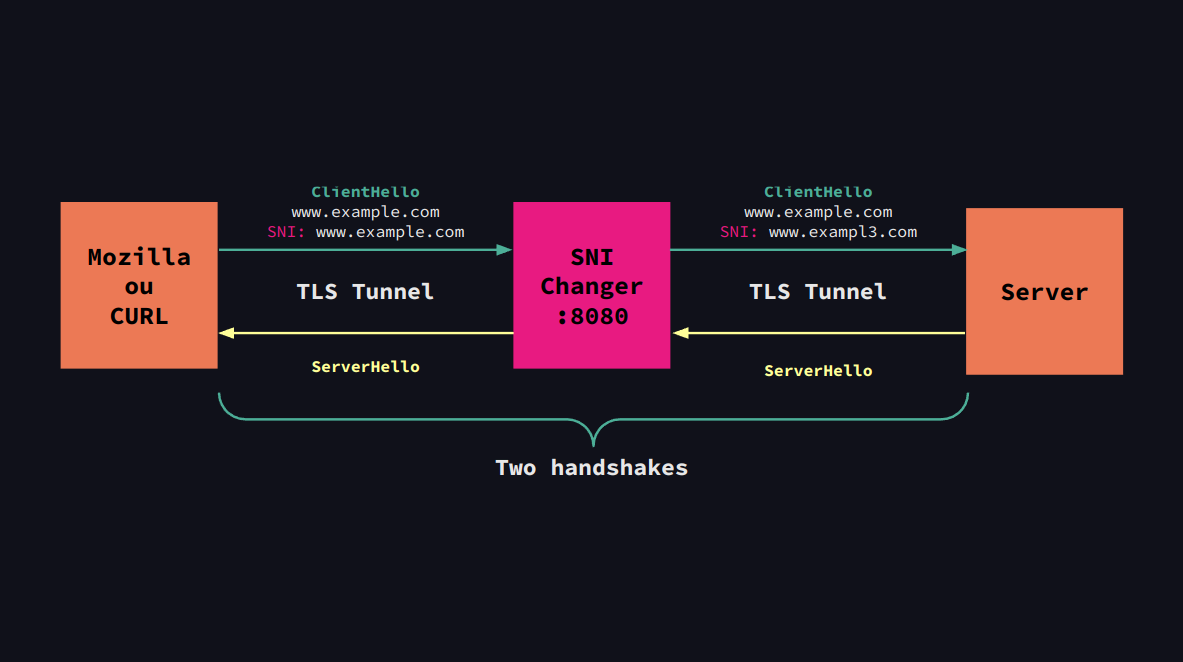
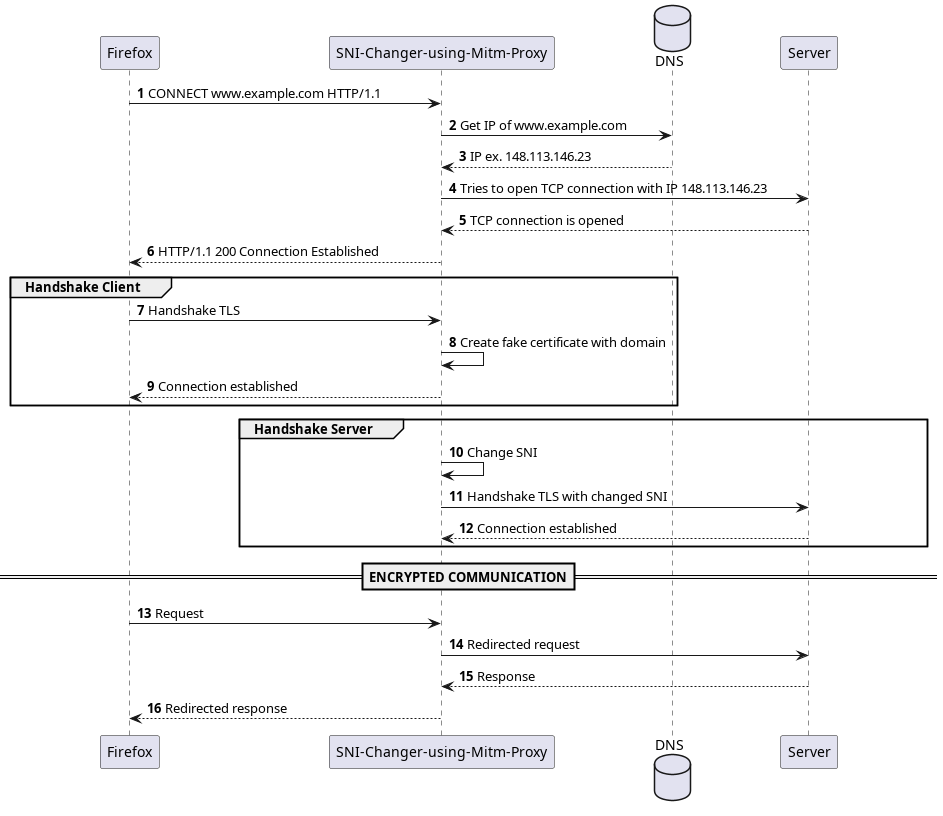
The SNI-Changer is a tool designed to change the SNI extension of the ClientHello message. To do this, a TLS connection is established with the user, pretending to be the server, thus providing a certificate signed by a user-created root certificate. With the target server, another TLS connection is established, modifying one of the extensions of the TLS protocol, the Server Name Indication (SNI). After both of these connections are in place, any data transmitted between the user and the server is redirected to the opposite party.
What is the ClientHello message?
When a client (such as a web browser) initiates a secure connection with a server using HTTPS (HTTP Secure), it begins with a step called the “Client Hello”. This initial message serves as a greeting and a request to establish a secure connection using the Transport Layer Security (TLS) protocol.
What is SNI?
The Server Name Indication (SNI) is a part of the Client Hello message. It’s especially important in scenarios where a single server hosts multiple websites or services, each with its own domain name and SSL/TLS certificate. Before SNI, servers could only present a single certificate, often for the default website hosted on the server. SNI resolves this challenge by enabling the client to specify the domain name it’s trying to access during the Client Hello.
Why change the SNI?
The Server Name Indicator (SNI) is not encrypted, rendering it susceptible to interception by firewalls and other network devices. This enables third parties to identify the specific websites we are accessing, raising concerns about data privacy and security.
Technologies used
The C language was used with the OpenSSL library for the establishment of connections and certificate creation.
Example
Running the application, we have a proxy available on port 8080. Its functionality can be tested using curl, which allows you to make a request to a website, specifying a proxy. Therefore, the following command was used for testing:
# The "--insecure" option disregards the fact that the root certificate
# is not recognized by the system. This option can be removed
# if the certificate has been added to the root certificates directory.
curl https://www.example.com --proxy localhost:8080 --insecure -v
Below, we can observe that the application correctly responds to a request, establishing a TLS connection with Firefox and another with the destination server.
(debug) > NEW CONNECTION <
(info) Empty position: 0
(info) Connection fd: 4
(debug) Message sent!
(info) Creating a TLS connection:
(info) Hostname: www.example.com
(info) SNI: www.example.com
(info) Port: 443
(debug) SNI changed to: www.exampl3.com
(debug) Attempting handshake with www.example.com...
(debug) Handshake successful!
(debug) > CONNECTION ESTABLISHED <
(debug) Request sent from 4 to www.example.com!
(debug) Response sent from www.example.com to 4!
(debug) Response sent from www.example.com to 4!
(debug) Request sent from 4 to www.example.com!
(info) Connection closed (user-fd/host-fd[hostname]: 4/5[www.example.com]).
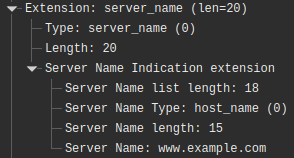
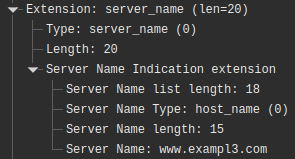
This modification was verified with the assistance of Wireshark, as illustrated in Figure 2. The first TLS connection is depicted in green, while the second one with the destination server is shown in blue. In Figure 3, we see the correct SNI (www.example.com), whereas in Figure 4, we have a modified version (www.exampl3.com).

With this, it is possible to verify the functionality of the tool, which enables the modification of the SNI through two TLS handshakes.